Connect
Search
Tuesday
Oct022012

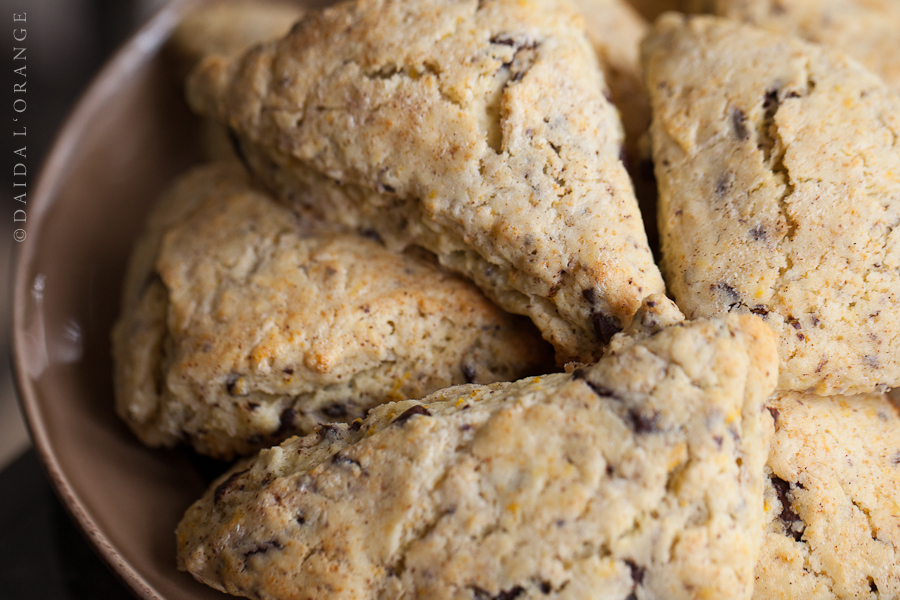
KITCHEN NOTES: Recipe Development::Orange Chocolate Scones

The last Saturday morning of September greeted us with a pleasant yet unfamiliar sound. The sound of rain. I love when it rains. Mostly because we rarely get any rain, but it's a soothing sound that makes me happy nonetheless.

I look forward to lazy weekend mornings. Mornings that the children spend in bed cozily snuggled up in the duvets. Mornings when the middle child still manages to wake up before her siblings with her usual "When can we eat?" inquiry, followed by her insistent "I want to eat now!". Mornings when the oldest is not being rushed out the door to get to her bus or the younger two running to the minivan three days a week to get to preschool on time.

For Cinnamon, my middle child, this will be her last year going to school part-time, as she goes to kindergarten every day next year.

Sage still has one more year of preschool but I fear that the time will pass by quicker than I'd like. For now, I'll try to cherish these fleeting moments as long as possible, remembering to capture as many of them with my camera before it's too late.

Saffi giving Sagey a piggyback ride

So, on weekend mornings, I like to make something special for the kids. This particular Saturday morning the plan was to make Cranberry Orange scones. I used to eat those all the time at that chain coffee place I've successfully avoided for close to a year as I quickly got bored with their pastries and coffee. Cinnamon also liked those scones, but Saffron mostly preferred the lemon pound cake or the vanilla scones.

I was all set to measure out the cranberries and soak them in Grand Marnier when Saffron showed up in the kitchen asking what I was making. She didn't seem pleased with my answer and, honestly, I thought she was just being pouty. What's a mom to do in such a case? Well, change course. Leave out the cranberries and replace them with chocolate.

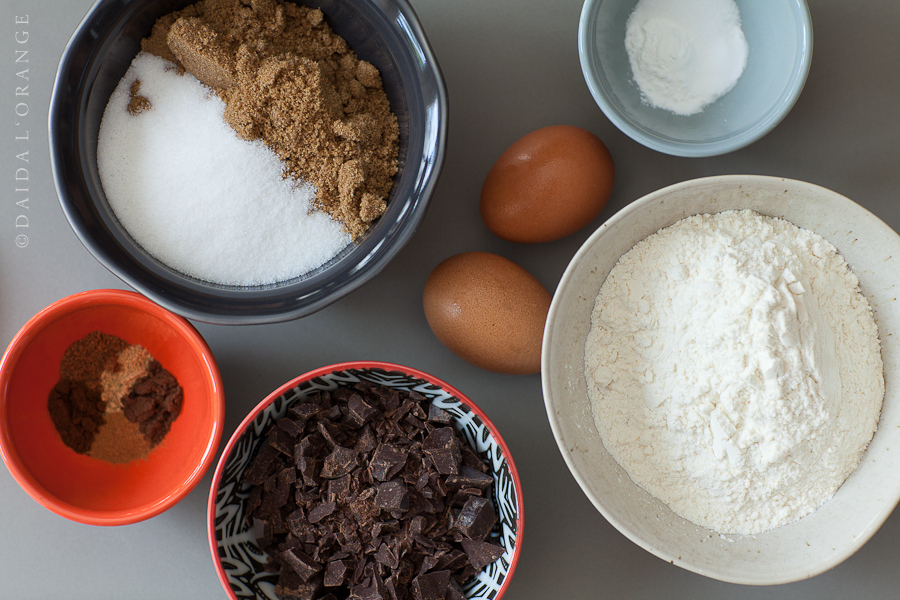
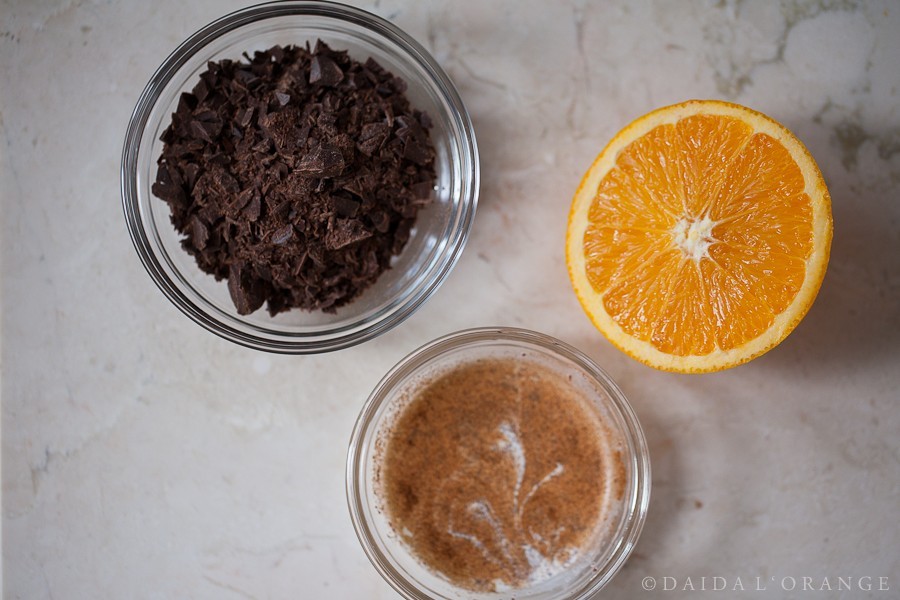
Chopped chocolate, orange, cream with cinnamon (to brush before baking)

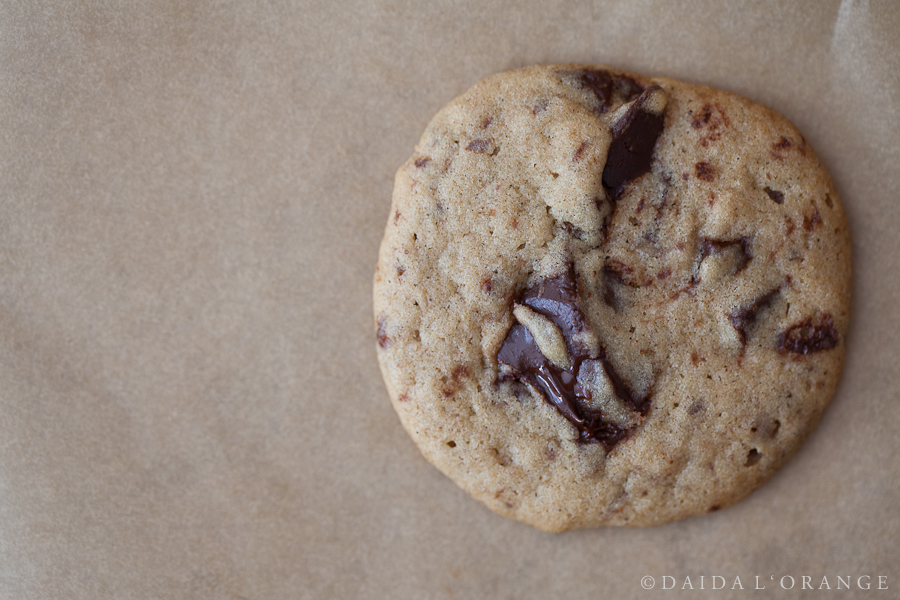
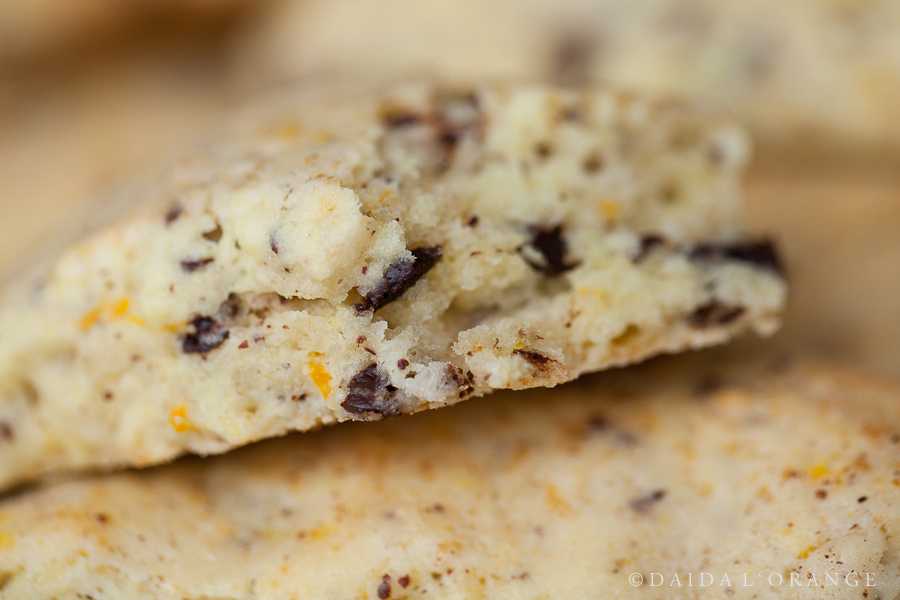
So, that's exatly what I did. After several unsuccessful attempts this summer, I finally reached my goal of a cakey scone. Just the way I like it.


Orange Chocolate Scones

this batch made 16 scones


INGREDIENTS

125 grams all-purpose flour

100 grams cake flour

2 teaspoons baking powder

1/4 teaspoon sea salt (I used Pink Himalayan)

60 grams granulated sugar

100 grams unsalted butter, cold and cut into small cubes

2 large eggs

60 ml heavy cream

1 tablespoon Grand Marnier

zest from one medium orange

1 tablespoon orange juice, freshly pressed

50 grams bittersweet chocolate (I used El Rey 73.5%), chopped

FOR TOPPING: 30 ml heavy cream mixed with 1/2 teaspoon cinnamon


INSTRUCTIONS

Heat oven to 425°F. Line one rimmed baking sheet with parchment paper.

While measuring out the ingredients, place cubed butter in freezer.

Combine flours, baking powder, salt, and sugar in a large bowl. Remove butter from freezer and gently rub the pieces into the flour mixture until roughly combined. There is no need for the butter to be completely incorporated (I've left a few larger pieces). Set aside while preparing the wet ingredients.

Whisk together eggs, cream, Grand Marnier, orange zest, and orange juice. Pour wet ingredients into the dry ingredients.

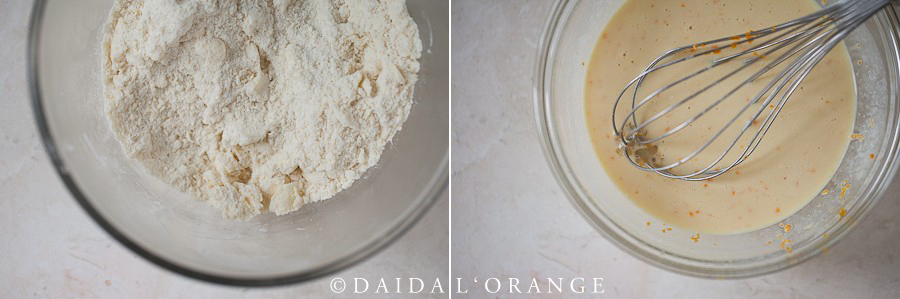
Using a spoon, quickly bring together the wet and dry ingredients until they form a sticky ball of dough. Fold in the chocolate chunks.

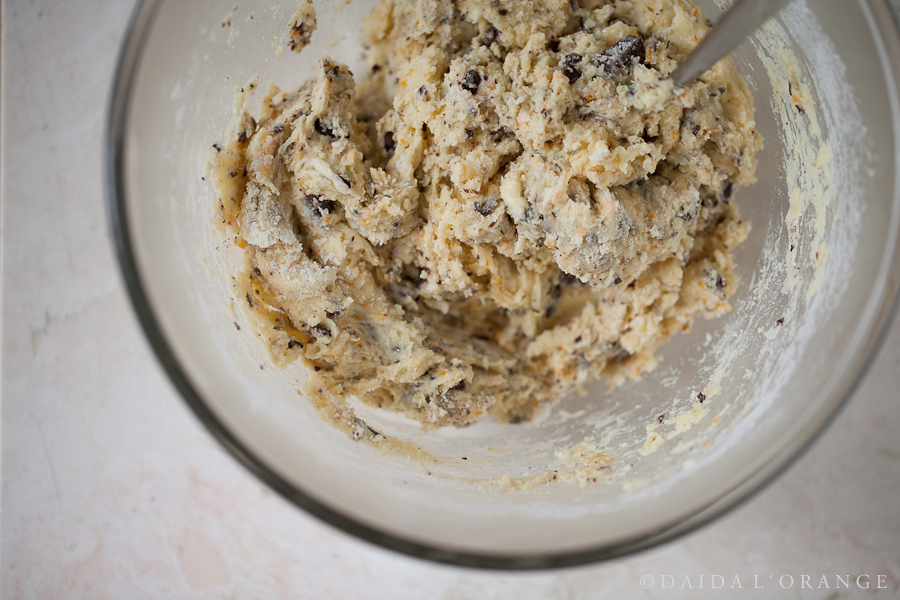
Turn out the mixture onto a well-floured surface and gently, but briefly, knead the dough. Flatten into a rectangular shape and cut into 16 equal portions. (You can also form the dough into an 8" circle and cut into 8 large scones). Brush with the cream/cinnamon mixture.

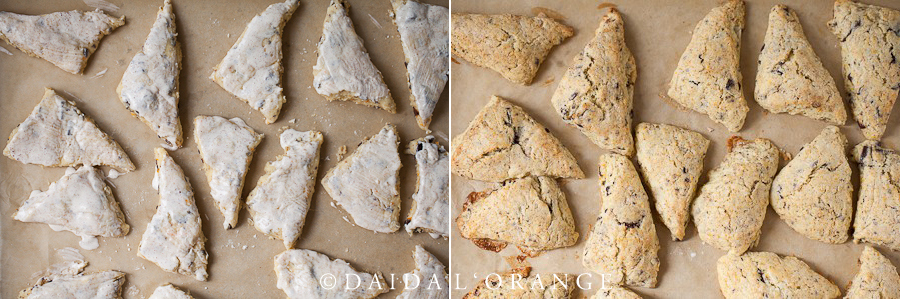
Bake for 10 minutes. Serve immediately.


THE NOTES (as jotted down in my journal):

Although I had intended on baking cranberries into this scone recipe, the vision of the children picking them out and casting them alongside their plates changed my mind to something I knew they would enjoy on this rainy Saturday morning - chocolate. I could tell that Sagey thoroughly enjoyed the scones.

My previous attempts at writing scone recipes ended up with a cookie-like texture. Still good, but not the cakey version I was envisioning. The first scones I baked were Lemon Poppy Scones. That was back in early August in Berlin. The next day, I tried again and made Vanilla Scones. Then there were Lemon Buttermilk Scones, Cinnamon Spice Scones, and a recipe for Pumpkin Scones that I have not yet made (I'm planning on using real pumpkin, not canned, for these).

What the previous scone recipes all lacked was more fat and moisture. Actually, the Lemon Buttermilk Scones had no butter at all. By increasing the amount of butter, adding an extra egg, and replacing some of the all-purpose flour with cake flour, I was able to attain a tender, cakey scone.

Changes I would try for next time:

Surprisingly, I had no notes for this recipe other than jotting down "Yum!".

* For another recipe... replace chocolate with dried cranberries soaked in Grand Marnier.


Thursday
Sep272012

KITCHEN NOTES: Recipe Development::Spiced Chocolate Chunk Cookies

Autumn is finally here - my favorite season of the year. A time between the warmth of summer and the cold of winter. Granted, it's still in the 80s here in Texas, but soon it will start to cool down and we'll be sitting in front of the fireplace looking out of the large picture window at gray skies before we know it.

Autumn is also the time when I start to spend more time in the kitchen. A time when the scent of cinnamon, ginger, cloves, and nutmeg start filling the air. A time when the sweet scent of the hot air from the oven envelopes the kitchen with happiness. It's also a time when the sink and counters overflow with dirty dishes waiting to be washed up for the next batch of cookies or a simple kuchen (cake). Really, anything sweet that needs to be baked.

This week I decided to replace all of my baking spices with freshly ground ones from my favorite spice shop. I drove over to the shop this past Monday (the packets below have the incorrect date on them) after dropping off the younger two at school and bought two different types of cinnamon (the other one being the Saigon Cassia Cinnamon). I decided to use the Organic True Ceylon version for these cookies.

This recipe started as a few scribbles in my kitchen journal - the one I took with me while vacationing in Berlin this past summer. I never got around to baking these, but felt that now was a good time to make something with spices and chocolate. Real chocolate - despite the fact that I have at least seven different bags of chocolate chips sitting in the pantry.

Now, cinnamon that's been sitting around for two years in no way resembles what I purchased. In the past, I've bought all of my spices in bulk from the grocery store. Having discovered the Savory Spice Shop back in March, I now exclusively purchase all of my spices here. The spices are freshly ground each week and their selection is astonishing. Plus, everyone who works there is exceptionally knowledgeable and friendly.

After my last chocolate chunk cookies, I wanted to change the recipe so that I had more of a chewy texture rather than cakey. It's not that I disliked the cakey version. I simply wanted something different. The main changes I made - adding bread flour, more butter, and more brown sugar than granulated sugar. The result was a flat and chewy cookie full of spicy flavours and chocolate throughout.

I scooped out the dough with almost-level tablespoonfuls which yielded in 36 cookies. They didn't last long.


Spiced Chocolate Chunk Cookies

this batch made 36 cookies


INGREDIENTS

100 grams all-purpose flour

125 grams bread flour

1 1/2 teaspoons baking powder

1/4 teaspoon baking soda

1/2 teaspoon sea salt (I used the regular Baleine sea salt)

1/2 teaspoon cinnamon (I used Organic True Ceylon Cinnamon)

1/2 teaspoon ginger (I used Organic Chinese Ginger)

1/4 teaspoon allspice (I used Jamaican Allspice)

1/4 teaspoon nutmeg

1/4 teaspoon cloves (I used Madagascar Cloves)

200 grams unsalted butter, room temperature

150 grams light muscavado sugar

50 grams granulated sugar

1 large egg

1 large egg yolk

1 teaspoons vanilla extract

100 grams bittersweet chocolate (I used El Rey 73.5%), chopped in half-inch chunks

Vanilla extract not pictured - forgot to photograph it

INSTRUCTIONS

Heat oven to 350°F. Line three rimmed baking sheets (I use jelly roll pans) with parchment paper.

Combine flours, baking powder, baking soda, salt, and spices in a medium bowl. Set aside.

In bowl of stand mixer, with whisk attachment and on medium-high speed, beat butter until creamy (about 2 minutes). Add sugars and continue beating at same speed for another 2 to 3 minutes until light and fluffy.

Add whole egg, egg yolk, and vanilla extract and mix until well incorporated.

With mixer on low speed, slowly add flour mixture. Beat just until combined.

Remove bowl from mixer stand and gently fold in the chocolate chunks.

Cover bowl with plastic wrap and place in freezer for 15-20 minutes.

Remove dough from freezer. Drop dough by non-rounded tablespoonfuls spaced about two inches apart.

Bake for 12 minutes. Remove from oven and carefully slide paper with cookies onto a large cooling rack.

Continue with rest of dough. This yielded exactly 36 flat and chewy cookies.


THE NOTES (as jotted down in my journal):

My previous attempts at a chewy cookie recipe didn't work. While the cakey version still tasted great, I wanted to see how I could make the cookie more chewy. I spent my summer vacation researching just that and came up with something that worked. The percentage of butter needed to be increased (88% as opposed to 33% in my Amethyst Chocolate Chunk Cookies - in baker's percentages). I also found out that bread flour, due to it's high protein content, was able to absorb more liquid which would result in a more chewy texture. Using brown sugar also contributed to chewiness.

Thus, this recipe was born. And although there are myriads of chocolate chip/chunk cookie recipes...this is another of my versions.

Changes I would try for next time:

There weren't too many notes for this recipe. As I'm never able to "just let things be", I'm always finding something to either change for next time or to create a new recipe.

* Use melted butter. Per my research this summer, and from past experience, I discovered that melted butter also contributes to a more chewy cookie. Somehow I forgot to use that technique here.

* Omit the allspice. My husband mentioned that he noted the taste of baking soda. After tasting a few cookies (all for the sake of experimenting), I noted that it might be the allspice that was overly "spicy" and "peppery".

* Reduce baking time by one or two minutes. 10 minutes as opposed to 12.

* Let cookies sit on baking sheet until slightly cooled. I took the cookies off the baking sheet immediately. Will let them cool down slightly next time.

* For another version...omit the chocolate. My original notebook scribbles did not include adding chocolate. It was simply a spice cookie. 


Wednesday
Sep052012

THE RELUCTANT DINNER

A nap with my oldest on this reluctantly lazy afternoon while the younger two are upstairs playing.

A flashback to when she was just a baby - so tiny and full of spirit. Not unlike now. Still tiny. Still full of spirit and with a mind of her own.

Off to first grade this year. Oh, where has the time gone? She's already talking about saving the stacks of leftover and unused diapers for her own children.

Please don't grow up so quickly.

It's been forever since I took a nap with her. Today it was needed. I'm not one to stop moving during the day. "Relaxing" is not a word I know too well. This afternoon I knew it.

Glancing up at the clock, still feeling a bit guilty for not "doing" something, I reluctantly leave my daughter sleeping on the bed - the one under the window in our room. The one still without curtains although the curtain rods were finally put up this year (five years after we moved in).

I go into the kitchen and stare at the pantry. The flour moths are still there. I have no time to figure out which bag of flour or grain is the culprit. Truthfully, I don't care. I'm too tired these days. If I happen to come across it, I will toss it out.

For now, I need to figure out what to make.

I put on a large pot of water to boil. Almost plain penne pasta is what the kids prefer. No sauce. But lots of freshly grated Parmesan.

I locate the bunch of asparagus in the vegetable bin. The bunch I bought about a week ago. I take out a red bell pepper as well and slice it up. My main ingredients.

Olive oil and butter go into the pan. After a minute or two, I toss in the chopped garlic and the last shallot that I had from before we left on vacation this summer. I need to buy more shallots. This one will do.

The asparagus and peppers are next. I grab a lemon from the bottom refrigerator drawer - the one also containing the oranges and apples. I grate the skin of one of the lemons into the pan. I use lemon zest - a lot. At times I feel sorry for all of the zestless lemons. Such a simple ingredient but packed with so much flavor. A dash of salt and freshly grated pepper followed by a squeeze of half of the lemon and the meal is nearly finished. Something else is missing. Texture. Crunchiness. I tossed in a handful of sliced almonds and decide that was the missing ingredient.

I set out the plates outside on the patio tables - the kids have their own table. The larger table has only four chairs. I open up a bottle of red "backyard" wine from Concannon and pour a glass.

I muster up the energy to go back inside and grab my camera. The only photo I took was the one above. I didn't plan the recipe as I do my desserts. No research went into it as the extensive research I do for desserts. No measuring. It's a matter of simply tossing together what's on hand and what I feel like preparing at the time.

This was tonight's reluctant dinner. And it turned out better than expected.

Wednesday
Jul042012

KITCHEN NOTES: Recipe Development::Almond Peach Cake

"What do you think?", I asked my husband as he cleaned his plate.

"It's good", he says.

"That's it?", I reply.

"Can I have more?", he asks.

I guess I'll take that as my answer, although I would have liked a little more input. Which flavour stood out more? What was the overall texture? You know, questions that are important to know when coming up with a new recipe. Having another opinion helps. So, when I asked what I should change for next time, aside from reducing the baking time, he replied "Nothing. It's perfect as is." I can work with that, but I'm not one to simply leave things as they are - particularly when it comes to desserts.

Originally, I called this cake "Cake Inspired by Summer". At least that's how it's written in my journal. For some reason, I find myself experimenting with a new recipe shortly before it starts to get dark, which means that step-by-step photos are few. In this instance, it was after 18,30h when I gathered together the ingredients and started to measure and write down the quantities of each ingredient.

This recipe started out as a desire to have a simple Summer cake using the dozen or so apples that are scattered about in the refrigerator. Instead, I decided to use one of the three peaches that were starting to soften. They were still mostly firm - I'd just bought them two days before but had left them in the paper bag together (touching each other as they shouldn't be) so a few started to bruise.

These were local peaches - from Fredericksburg. Sweet and delicious. I looked up the "PEACHES" section in The Flavor Bible and selected a few choices of flavours that would compliment the peaches: almonds, cream, rum, and brown sugar. I used the white rum but think that perhaps I should have added one tablespoon to the batter and the other to the peaches.

As the butter was mixing with the caster sugar in the stand mixer, I walked away from the counter to my journal to jot down a few notes. A moment later I heard a subtle cracking sound.

"What was that?", my husband asked. I turned to find that one of the eggs had rolled off the counter and splattered on the floor. My husband suggested that I simply scoop it up and use it. Did I? No. I threw it away, cleaned up the floor, and took another egg out of the refrigerator and placed it in a cup of warm water to quickly bring it up to as close to room temperature as possible before I had to add it to the butter and sugar.

I have the tendency to overthink my work. I strive for perfection knowing that the state of perfection does not exist. Despite the overbaking, the cake was delicate and flavourful.

I will be making it again soon - with a few minor changes.


Almond Peach Cake

one 8-inch cake


INGREDIENTS

1 peach, diced

2 tablespoons white rum (I used Oronoco)

1 tablespoon dark muscavado sugar

170 grams unsalted butter, room temperature

150 grams caster sugar

2 eggs, room temperature

150 grams cake flour

125 grams almond meal (finely ground almonds)

1 1/2 teaspoons baking powder

1/2 teaspoon fine sea salt

30 ml heavy whipping cream


INSTRUCTIONS

Heat oven to 350°F. In a small bowl, combine the diced peaches, rum, and dark muscavado sugar. Set aside.

Butter bottom and sides of an 8-inch springform pan. Line bottom of pan with parchment round and butter that as well.

In bowl of a stand mixer, cream butter and caster sugar at medium-high speed until light and fluffy (5 or more minutes), scraping down sides of bowl as needed. In the meantime, prepare other ingredients.

In a medium bowl, combine flour, almond meal, baking powder, and salt. Set aside.

To the fluffy butter and sugar mixture add the eggs, one at a time, and mix just until combined.

Reduce mixer speed to low and alternate adding the flour mixture with the cream, starting with a third of the flour mixture and ending with the cream.

Pour the batter into the prepared pan.

Top with the drunken peaches.

Bake for 45 minutes (I baked this for 52 minutes and it was too long), or until skewer inserted in middle comes out with a few crumbs attached. Remove cake from oven and let cool on a wire rack. We waited until the following morning to eat it.


THE NOTES (as jotted down in my blue journal):

What started out as a light Summer apple cake, turned into a delicious almond peach cake. The intention was the same - simple and flavourful. If you're patient to wait until the following day to eat the cake, you'll notice that the flavours have had a chance to develop further. Coffee and cake. Perfect for a warm Summer breakfast.

Changes I would try for next time:

* Reduce baking time. I baked the cake for 52 minutes at which point the sides started to brown more than desired. In reality, I was outside watering the herbs in their containers and didn't monitor the oven. I will try 45 minutes next time.

* Reduce sugar and salt. I know that I wrote this down in the journal, but I'm not sure I'd touch the sugar next time. Perhaps I will reduce the salt to 1/4 teaspoon salt.

* Make more moist. I need to experiment with this challenge - more butter, more eggs? I'm guessing that reducing the baking time will help with this, so I might not make any changes to the eggs and butter for the second version.

* Substitute cake flour. The cake needed more structure. It wasn't too bad but I'll need to experiment with a higher protein flour.

* Use whole milk instead of cream. Perhaps use 3 tablespoons of whole milk instead of the 2 tablespoons heavy cream. Might also contribute to the moistness.

* Reduce almond meal/increase flour. Also need to experiment with this change for next time. Perhaps 175 grams cake flour and 100 grams almond meal.

* Add rum to batter and peaches. Next time I will see what the difference will be when I split the rum between the batter and the peaches.


Monday
Jul022012

BELUGA LENTIL SALAD


It was after 18h and I still didn't have an idea what to make for dinner. I looked in my pantry at the many Whole Foods bulk containers and chose the black beluga lentils.

I measured out one cup of the lentils, rinsed them, and cooked them in water for about 25 minutes. In the meantime, I chopped several cloves of garlic. I love garlic so I tend to use more than most people might. In this case, I believe it was about 7 cloves.

Walking outside onto the back patio, I selected a few sprigs of fresh Italian oregano and thyme. The leaves were picked off and added to the garlic, being further chopped. I found two small red bell peppers from a Farmer's market purchase in the vegetable bin and chopped those. Chopped a handful of broccoli florets.

Directions are simple. Cook garlic with herbs in olive oil over medium heat. Add peppers. Add broccoli. Briefly cook. Remove from heat. Cook spaghetti. Drain beluga lentils. Return lentils to pot. Add veggies, zest of one lemon, and a squeeze of lemon juice. Add salt and pepper. Spoon over spaghetti. Top with feta and enjoy.

The lentil and veggie mixture can be eaten as a salad or spooned over pasta.


Beluga Lentil Salad


INGREDIENTS

1 cup beluga lentils, rinsed and drained

1 tablespoon olive oil

7 garlic cloves, chopped

fresh oregano leaves

fresh thyme leaves

1 red bell pepper, diced

handful of broccoli florets, chopped

zest of one lemon

squeeze of lemon juice

sea salt

freshly ground black pepper

Greek feta, crumbled


spaghetti (optional)


INSTRUCTIONS

Cook lentils in water until tender - about 25 minutes. In the meantime, cook the spaghetti if using this as a pasta topping.

Heat olive oil in pan. Add garlic and herbs and cook for a few minutes.

Stir in the peppers and broccoli. Cook further for a minute or two. Remove from heat.

Drain the lentils and return to pot. Add the cooked veggies, lemon zest, and a squeeze of lemon juice from half a lemon. Season with salt and pepper. Spoon into serving bowl and top with crumbled feta.

Can be eaten as a side dish or as a pasta topping.