Connect
Search

Entries from May 1, 2012 - May 31, 2012

Thursday
May312012

BREAKING BREAD::My 3 Focaccias


Thanks to Twitter, I discovered a new baking challenge two weeks ago from a newly formed group called Breaking Bread Society. It was created for the purpose of inspiring us to get back to the basics of baking bread in our own kitchen, a task that may seem daunting at times. The group is founded by three lovely ladies: Lora - who authors the Italian blog Cake Duchess, Shulie - with her unique contribution of Indian and Mediterranian recipes on Food Wanderings, and Marnely - a native of the Dominican Republic and author of Cooking with Books. Take some time to find out more about the Breaking Bread Society and to visit the individual blogs of the founders. There are many inspirational recipes that I would love to try from all three blogs. Also, consider joining the group and trying your hand at next month's challenge.

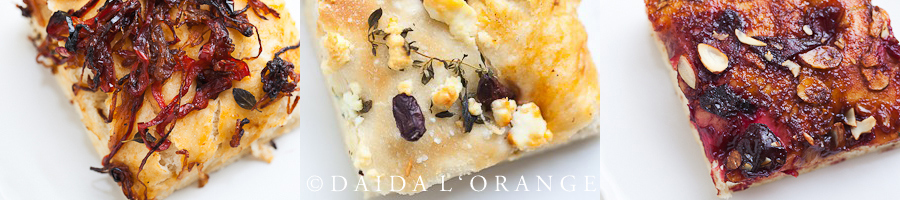
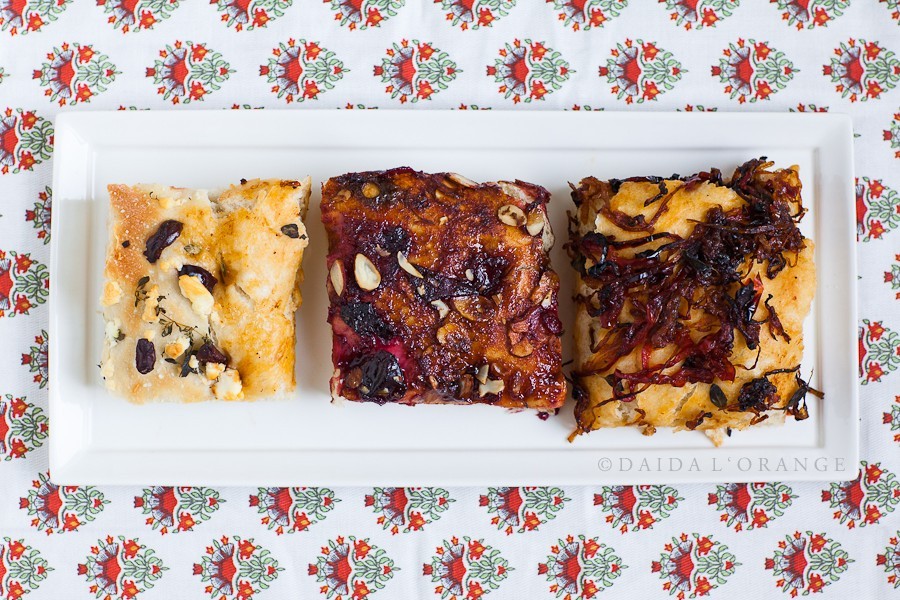
Of course, I waited until the last day of May to develop my recipes for not one, but three different focaccias. The reason for making two savory focaccias was because I knew my children would not eat carmelized onions, preferring rather the usual feta and olives. My middle daughter, Cinnamon, wondered why the "pizza" was not round and why it was softer than the Neopolitan pizzas I bake on a baking stone - the ones that bake in 7 minutes as opposed to 30 minutes. I think it will take some time to convince her that focaccias are not too different than pizzas. Being stubborn, as her mother, she refused to eat it.

It started with simple ingredients for the first dough...

...until I realized that the flour to water ratio was incorrect. I desperately tried to save the dough, but after 5 minutes of kneading it (by hand) I had to admit to myself that this recipe simply was not going to work. Sadly, I had to toss out the dough. After spending a few moments gathering new ingredients, I set out to make a new batch. This time, I added more water in addition to100g more flour, resulting in an elastic dough which rose nicely after one and a half hours.

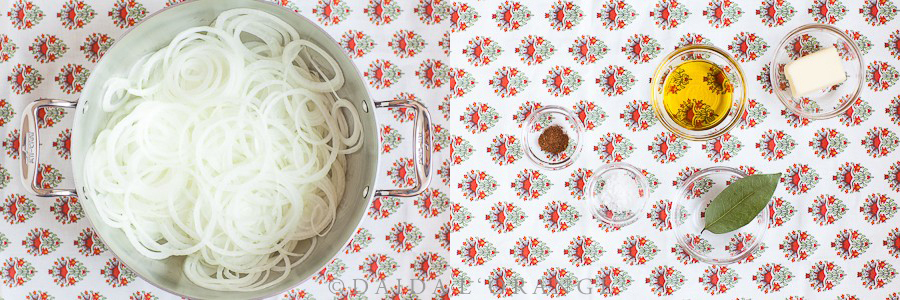
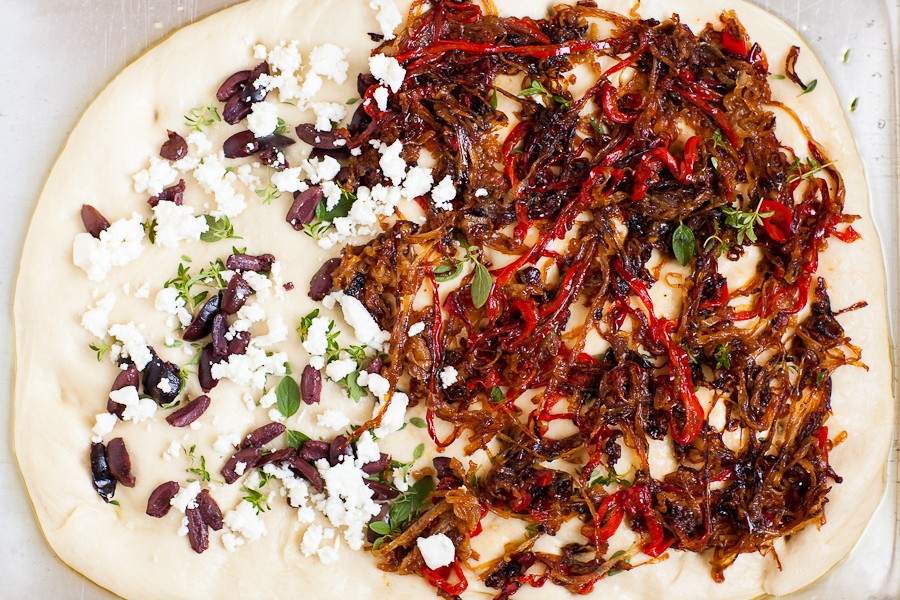
I knew I wanted carmelized onions as the topping and also knew that the time needed for these two mandoline-sliced onions (yes, this time I did use the guard and saved my thumb) and red peppers (not pictured) to fully carmelize would be close to an hour.

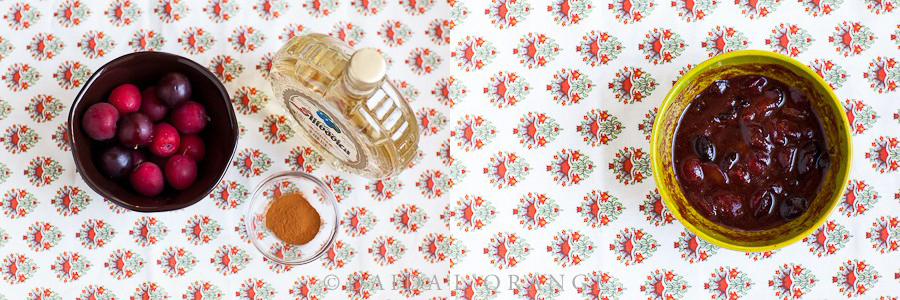
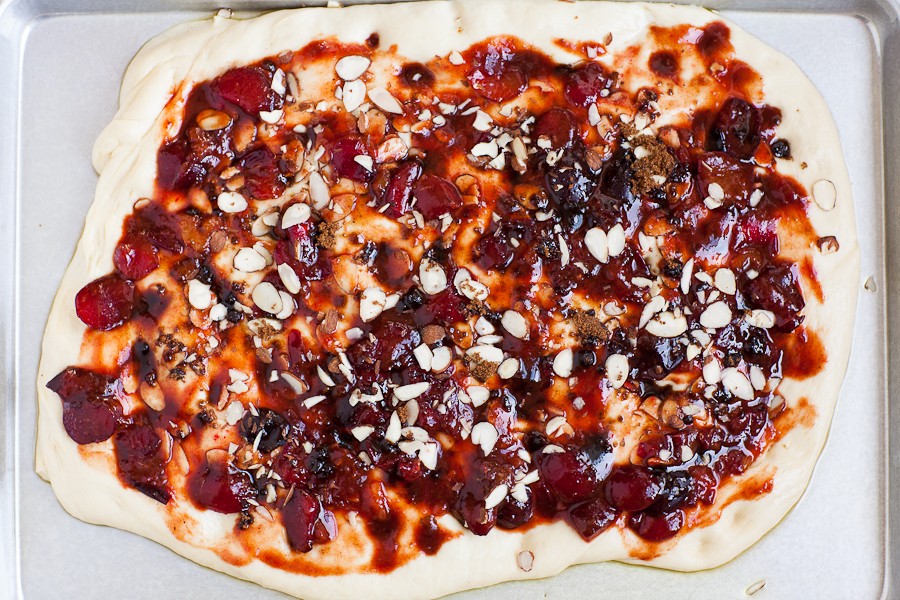
As the onions were cooking, I prepared the topping for the sweet focaccia. I had baby plums on hand, along with Šljivovica, and cinnamon. I then consulted the Flavor Bible to help me put together something quickly. The other ingredients not pictured here (I will have to write up another post at another time with more accurate measurements along with using more plums) are caster sugar, dark muscavado sugar, vanilla extract, nutmeg, and lemon zest.

I walked outside and picked fresh thyme and oregano from my little garden.

The dough continued to rise a second time for 30 minutes before it went into a 425°F oven. I baked both trays of focaccia at the same time, rotating the trays (front to back + top to bottom) after the first 15 minutes.

I scattered fresh thyme and oregano leaves over the top and sprinkled Portuguese fleur de sel over the entire dough. Over half of the dough, I crumbled Greek feta and topped with Kalamata olive wedges. Over the other half of the dough, I spread the carmelized onion/red bell pepper mixture.

Before topping the sweet focaccia with the plum mixture, I scattered almond slices and sprinkled brown muscavado sugar over the top. I repeated these two ingredients on top of the plum mixture as well.


Focaccia Dough


INGREDIENTS

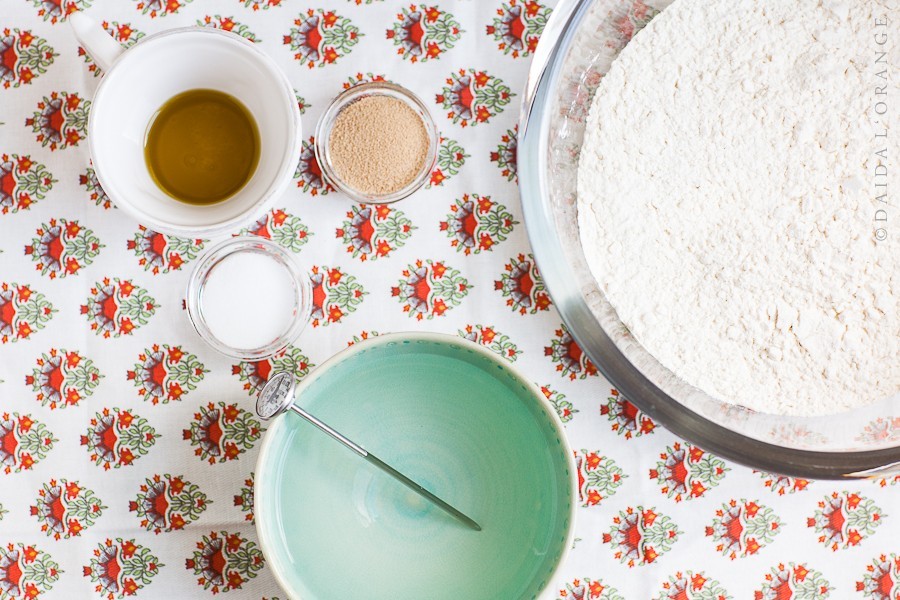
1 kg (35.2 ounces) bread flour

1 tablespoon fine sea salt

600 ml lukewarm water (105°F)

14 grams (1/2 ounce / 2 packages) active dry yeast (I used Red Star)

40 ml extra-virgin olive oil

8 tablespoons extra-virgin olive oil (divided) for drizzling over top


INSTRUCTIONS

Stir together flour and salt in a large bowl. Set aside.

Lightly oil another glass bowl for proofing dough. Set aside.

Dissolve yeast in warm water (about 5 minutes). Stir oil into yeast mixture, pour into flour mixture, and stir together with wooden spoon until dough comes together. Turn dough out onto lightly floured surface and knead until smooth and elastic - about 10 minutes. Place dough into oiled glass bowl, cover with plastic wrap, and cover with one or two dishtowels (I used one thick dishtowel folded in half). Find a warm place for proofing the dough (my preferred place is the oven, heat not turned on, but with the oven light on). Let rise until doubled in size - about 1.5 hours.

After dough has doubled in size, remove dough from bowl onto a lightly floured surface and cut into two equal pieces. Oil two jelly roll pans (I used this one which measures 18"x13"x1") and press each dough half into one pan. Cover with plastic wrap and kitchen towel and let rise for another 30 minutes (until close to doubled in size).

Meanwhile, preheat oven to 425°F.

With fingertips, after the second rise, make indentations in dough spaced about 1" apart. Drizzle 4 tablespoons olive oil over each focaccia and top with toppings of choice.

Bake for 25-30 minutes, or until golden brown. Cut into squares and serve.


***Carmelized onion/red pepper topping recipe and the plum topping for the sweet focaccia will be part of two separate posts.


Sunday
May202012

KITCHEN NOTES: Recipe Development::Flourless Chocolate Torte version #1

It starts as a desire to make something - sweet, savory, simple, or a bit more complex. You jot down a preliminary list of ingredients, consult the Bible for some new flavor pairings, and research a few similar recipes. For recipe development, one might look to recipes of the past - either ones that were tried and true or ones handed down from family members, peruse the many online resources now available, browse through vast home libraries of accumulated cookbooks, or it might be as simple as trying something completely new and different. Regardless of the method, a recipe has to start somewhere. Notes are taken, ingredients prepared, and the experiment begins. A recipe is born. But it does not stop there. Refinements are made along the way and this is where my newest feature comes about.

In this first installment of my feature Kitchen Notes: Recipe Development, I start with a simple flourless chocolate cake. I wanted a flourless cake that was light and airy instead of dense and truffle-like.

I've made many cakes in my lifetime - the first one I recall was a boxed chocolate cake with the chocolate Better Crocker frosting when I was either 9 or 10 years old. Along the way, I've experimented with countless recipes, accumulated many cookbooks, clipped recipes from a variety of sources, and have amassed a great collection of cooking and baking magazines over the past two decades or more that now sit in plastic boxes in my garage. My latest cooking journal is a nice shade of aqua blue and has been recently brought back to life with my newest recipes and notes along the way. Many times over the past few years, I would simply make something and then forget exactly what I did or made. Now, I plan to change that with my Kitchen Notes. It's a place where I and my children (as they grow older and take more part in the kitchen) can refer to when we want to see how we made something and what we thought of it. I already have a few things jotted down about this recipe that I'd like to change, such as adding more rum.

The recipe, as written, was not bad (as can be witnessed by the few crumbs left over from finishing off the cake tonight). It's the quest for perfection that keeps one going. It's the constant wondering of "what if" - "what if I added more of this", "removed this ingredient", "used a larger/smaller pan", and so on that recipes constantly develop into new recipes with experimentation.

Without further adeiu...my Flourless Chocolate Torte, the first version.


Flourless Chocolate Torte - version #1

makes one 9-inch torte


INGREDIENTS

8 ounces (226 grams) bittersweet chocolate, chopped into half-inch pieces (I used El Rey Apamate 73.5% chocolate)

228g (2 sticks) unsalted cold butter, cut into 16 pieces

1 tablespoon white rum (I used Oronoco)

2 teaspoons Madagascar vanilla extract

1 Madagascar vanilla bean, seeds removed and combined with the extract

1 tablespoon Black Onyx cocoa powder

6 large eggs, separated and brought to room temperature

1/3 cup Dark Muscavado sugar

1/2 teaspoon cream of tartar

1/2 cup caster sugar

hazelnut meal, for dusting springform pan


heavy whipping cream

sliced almonds, toasted

caster sugar


INSTRUCTIONS

Preheat oven to 350 F. Butter a 9" springform pan and dust with hazelnut meal.

Slowly melt the chopped chocolate with butter using a double boiler or pan set over simmering water, making sure that the pan containing the chocolate and butter is not touching the water below it. Remove from heat and cool down to room temperature. When the mixture has cooled, add the rum, vanilla extract with vanilla beans, and the cocoa powder.

While the chocolate and butter mixture is cooling, cream the egg yolks with the dark muscavado sugar until light in color and creamy in texture.

Transfer to a large bowl (NOTE: this is where I should have used a much larger/wider bowl), and pour in the cooled chocolate mixture. Mix well and set aside.

Beat egg whites at high speed for one minute to break them up. Add cream of tartar and beat for another minute. Add caster sugar and beat whites until stiff peaks form, making sure not to overbeat them. Add about a third of the whites to the chocolate mixture and gently fold until incorporated. Add rest of whites in two more additions, taking care not to deflate the mixture.

Pour into prepared pan. Bake for 30-35 minutes, until skewer inserted in middle of cake comes out with a few moist crumbs attached. Let cool. Meanwhile, place bowl and whisk in freezer to chill for about 30 minutes before use. Right before serving cake, pour cream into chilled bowl and add sugar. Lightly whip the cream and fold in the toasted almonds (that have been cooled to room temperature). Slice cake and spoon a small amount of the cream. Serve.


THE NOTES (as jotted down in my blue journal):

The texture was exactly as I had set out to make - light and fluffy, even on the following day. My daughter described it as a brownie and my husband agreed, adding "but it's lighter".

Still light and fluffy the following day* Keep the 9" springform pan. The cake rose to about an inch over the height of the pan and sank as it cooled. I considered using a different size pan, but I'll keep this recipe at the 9" pan with 3" high sides. I wouldn't recommend using a regular cake pan as it might be too difficult to remove and the batter will overflow.

* Reduce, omit, or combine Black Onyx cocoa powder with Dutch process cocoa powder. The taste was intensely chocolatey. Next time, I will either leave out the Black Onyx cocoa powder completely, reduce the amount, or combine it with a Dutch process cocoa powder.

* Add more rum. Increase by 1 tablespoon, thus the recipe would now read 2 tablespoons white rum.

* Add more vanilla extract. Increase by 1 teaspoon, making the new amount 1 tablespoon vanilla extract.

* Add 1 egg yolk.

* Use cocoa powder to dust springform pan. Hazelnut meal might not be readily available at most stores, so I will use cocoa powder next time.


The next time I make this will most likely be this Memorial Day Weekend for guests - my husband's friend from Germany is visiting us with his family. So, in addition to my observations, I will have four new opinions and suggestions.